Short answer
For colour negative film, an RGB light gave more accurate colour than a white light, and colour that stayed more consistent from under- to overexposed frames. Scanning the red, green and blue channels as three separate exposures improved colour further: 65% more colour separation than white light on our setup. That is because a colour camera’s filters pick up some light from the other LEDs, and separate exposures avoid it. Once colours were matched, the differences in noise were small.
Three ways to light a negative
A broad spectrum
An LED panel or light table covering the whole visible range. One exposure per frame.
Three colours at once
Red, green and blue LEDs, each emitting a narrow band, adjustable separately. One exposure per frame.
One colour at a time
The same LEDs lit one after another, one exposure each, merged afterwards. Also called trichromatic or trichrome scanning.
Colour negative film is designed to be printed on paper that responds to narrow bands of blue, green and red. A camera’s colour filters are designed to match human vision, so they are broader and overlap. The differences between the three methods come down to how they deal with that mismatch.
This applies to colour negative film. Slide film is made to be viewed under white light, so a good white light is the right choice for it. For black and white film, the colour of the light makes little difference.
The test
We shot one strip of Kodak Gold 200, with a colour chart bracketed from three stops under to three over plus a set of everyday scenes, and scanned it four ways on the same camera and stand:
- White light
- A CineStill CS-Lite.
- RGB, balanced on screen
- Our own RGB light (670, 540 and 455 nm), set up the way a Capture One user would.
- RGB, balanced to the sensor
- The same light, adjusted using the raw values.
- Separate R, G, B
- The same LEDs lit one at a time; three frames merged into one raw file.
Each method got its own Obelisk calibration from its own scans of the chart, and every frame was converted with the same settings. Full details are under How we tested.
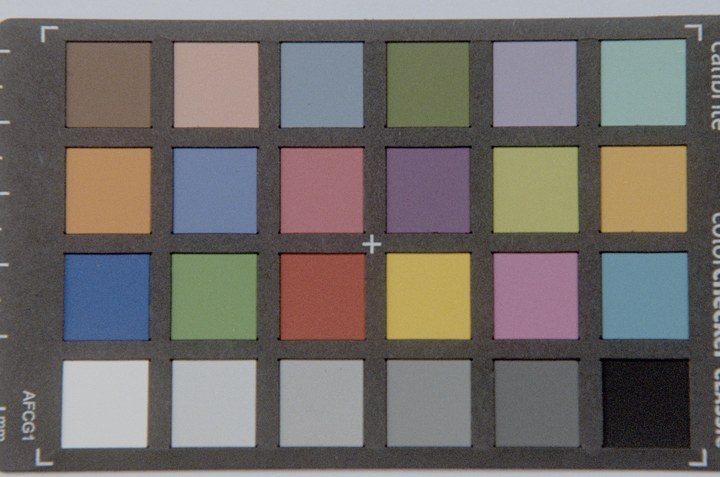
White light
C* 21.5
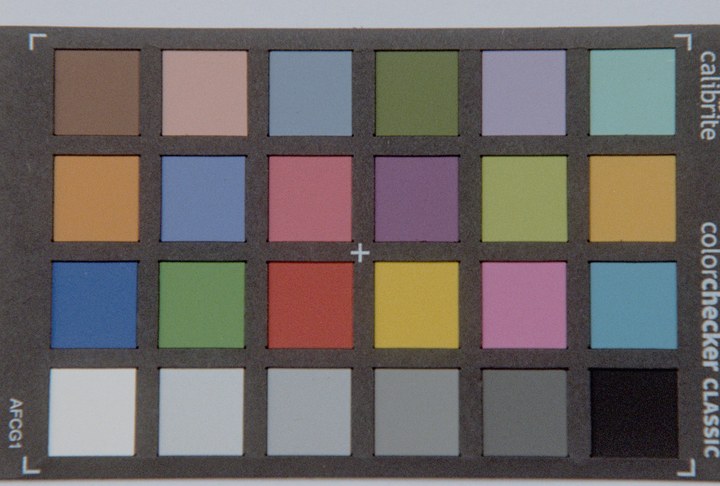
RGB, balanced on screen
C* 24.9
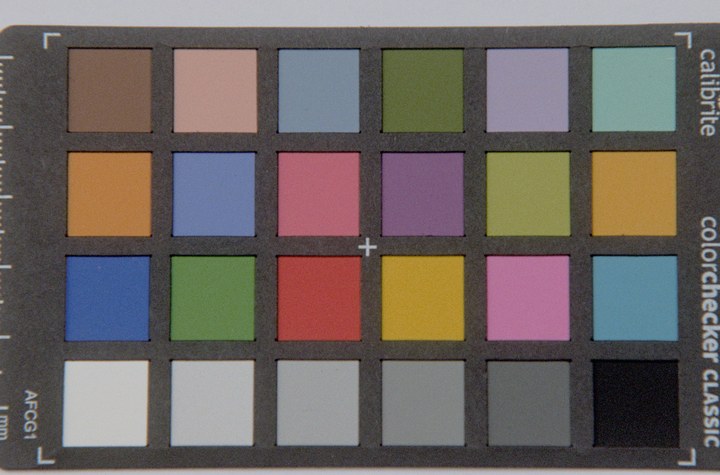
RGB, balanced to the sensor
C* 28.3
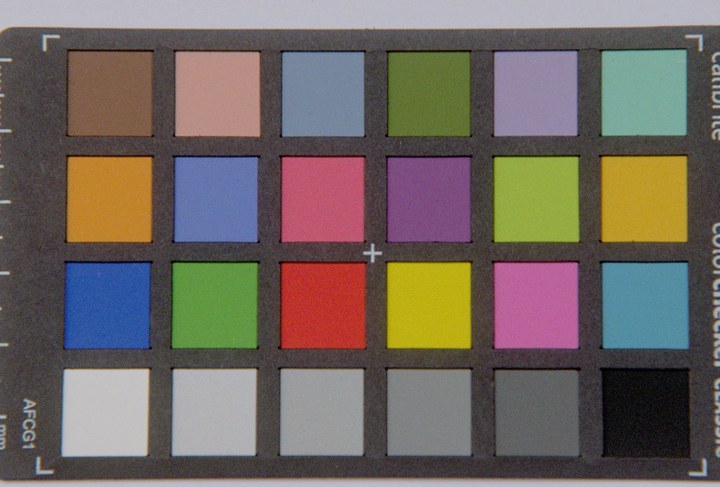
Separate R, G, B
C* 39.5
White light vs RGB
Under white light, each of the camera’s colour channels records a wide range of wavelengths, and the ranges overlap. The green channel, which should measure the film’s magenta dye, also picks up some of the yellow and cyan dyes. Calibration corrects most of this, but not all of it, because the amount of overlap changes with the density of the film. A white light also can’t be adjusted per channel: on our scans the orange mask left the blue channel more than a stop darker than green.
Each LED in an RGB light emits a narrow band, so each channel measures the film at close to a single wavelength. Compared with white light, after calibrating each:
More colour separation
Average hue error
Colour shift between −3 and +3 stops
Separate exposures
A monochrome camera has to scan colour in three exposures, because it has no colour filters. We didn’t expect three exposures to make much difference on a colour camera, which already separates colours with its filters. It turned out to make a large difference.
The reason is that the camera’s colour filters don’t fully block the other two LEDs. With all three LEDs on, this is where each type of pixel’s signal came from:
| Red LED | Green LED | Blue LED | |
|---|---|---|---|
| Red pixels | 90% | 6% | 4% |
| Green pixels | 14% | 57% | 29% |
| Blue pixels | 2% | 15% | 82% |
Green pixels got 43% of their signal from the red and blue LEDs. Calibration corrects for this, but only approximately: the mixing happens in the light reaching the sensor, while the calibration works on the film’s density, after the scan has been inverted. With one LED on at a time there is no mixing to correct. Compared with a single RGB exposure:
Colour separation, relative to white light
Colour shift between −3 and +3 stops
Colour error (ΔE) on frames left out of the calibration
The downside is three frames per negative instead of one, plus a step to merge them, which Obelisk now does itself (right-click the roll, Merge trichromes). Our three frames lined up within 0.6 of a pixel, so we didn’t align them. How much separate exposures help depends on how far your LEDs overlap with your camera’s filters. Ours peak at 670, 540 and 455 nm, and the camera was a Sony A7R IV. You can measure your own setup by photographing clear film with each LED on its own.
Matching the colour
A white-light scan can be brought close to an RGB scan with colour correction and more saturation, which is why converters such as Negative Lab Pro get good colour from most lights. More saturation also means more colour noise, so we compared the methods with their colour matched. White light needed about 1.8 times the saturation of the separate-exposure scans.




The differences were smaller than we expected. On the colour chart, separate exposures had the least colour noise (9.1, against 12.1 to 14.1 for the others); on a patch of open sky, white light had the most (4.25, against 2.8 to 3.5). At 100% the scans were hard to tell apart, because film grain makes up most of the noise in all of them.
Noise depends far more on exposure than on the light. Underexposed frames are stretched further when they are converted, and on those colour noise was up to twice as high as on a normal frame, whichever light we used. Separate exposures had the least colour noise at every exposure from three stops under to three over.
Balancing the light to the sensor
Set up on screen (Capture One)
Red and blue under half the sensor’s range
Balanced to the sensor
Brightest channel in the 85–90% target
Camera histograms, tethering software, Capture One and Lightroom all show the image after the camera’s white balance has been applied. Our camera multiplies the red channel by 2.6 and blue by 1.6, so a scan that uses the sensor’s full range in red looks clipped on screen.
Setting the white balance on the film base doesn’t help: the base then looks neutral, and nothing on screen shows how much room each channel has left. We set our light up the way a Capture One user might, with white balance taken from the rebate and the exposure raised until the rebate read just under clipping on the colour picker. At the sensor, that left the base at 47% red, 67% green and 46% blue. Balanced using the raw values, the same light reached 80%, 81% and 85%.
On this film the extra light made no measurable difference to noise, even on the frames overexposed by two and three stops, because film grain dominates. It also changed the leak: green pixels took 43% of their signal from the other LEDs, up from 25%. The extra headroom matters more with dense stocks such as Vision3, overexposed frames and the densest parts of an image, where a channel can run short of light.
- Check raw values, not the histogram. Obelisk’s RAW SCAN view shows each channel under the cursor as a percentage of the sensor’s range; RawDigger does the same for any raw file.
- Keep the clear film base below about 90% in every channel. It is the brightest part of a negative, so nothing in the frame will clip.
- Balance the channels when you need the headroom. If you also edit in Capture One, a setup that reads just under clipping there works for normal stocks.
Results
| Method | Frames | Separation | Colour error | Shift ±3 stops | Colour noise, chart / sky |
|---|---|---|---|---|---|
| White light | 1 | 1.00× | 12.9 · 9.3° | 7.9 | 12.1 / 4.25 |
| RGB, balanced on screen | 1 | 1.13× | 12.1 · 8.7° | 6.6 | 12.7 / 3.49 |
| RGB, balanced to the sensor | 1 | 1.26× | 11.9 · 7.7° | 7.1 | 14.1 / 3.41 |
| Separate R, G, B | 3 | 1.65× | 11.5 · 8.0° | 6.0 | 9.1 / 2.79 |
Lower is better in every column except separation. Definitions are under How we tested.
Which to use
Calibrate for it
It will convert a roll consistently. RGB mainly improves colour accuracy and consistency between frames.
An adjustable RGB light
Ideally from a maker that publishes the LED wavelengths.
RGB, one exposure
Calibrated for your light. Separate exposures for work where quality matters more than speed.
Separate exposures
On a colour camera or a monochrome one.
Two things matter whichever light you use:
- Invert before applying a camera colour profile. Raw converters apply the camera’s colour matrix along with its white balance, which mixes the channels before the negative is inverted. On our test brackets that made colour shift across exposures 1.6 to 2.2 times more than working from the camera’s own channels.
- Calibrate for the light you use. A profile belongs to a light as well as a film stock; in our measurements, changing the light changed the result more than changing the stock.
How we tested
- Camera
- Sony A7R IV with a Sony E 105 mm f/2.8 macro at f/5.6, ISO 100. Focus and film position fixed throughout.
- Film
- Kodak Gold 200: a ColorChecker bracketed ±3 stops in one-stop steps, plus everyday scenes, on one strip of 26 frames.
- White light
- CineStill CS-Lite, CRI 95+ as published (no R9 value given). 1/15 s; film base at 48% red, 75% green and 34% blue of the sensor’s range.
- RGB light
- Our own, with LEDs peaking at 670, 540 and 455 nm, at 1/80 s. Balanced to the sensor: base at 80, 81 and 85% (red, green, blue). Balanced on screen: white balance taken from the rebate in Capture One and exposure set so the rebate read about 253 on its colour picker, leaving the base at 47, 67 and 46%.
- Separate exposures
- The sensor-balanced LED settings, one LED at a time, 1/80 s each. Merged into one raw file by taking each pixel from the frame lit by the LED of its own colour, with the values unchanged.
- Calibration
- Each method calibrated in Obelisk from its own scans of the bracket; every frame converted with the same look.
- Separation
- How much saturation the chart’s 18 coloured patches needed to reach their published colourfulness, relative to white light (white light 2.44×, separate exposures 1.48×).
- Colour error
- ΔE*ab and hue error of the coloured patches at matched saturation, on each bracket frame in turn, with that frame left out when fitting the colour correction.
- Colour shift
- How far each coloured patch moved (a*b*) across the bracket at matched saturation.
- Colour noise
- Chart: variation of a*b* within the red, green, blue and grey patches at matched colourfulness, averaged over the −2, 0 and +3 frames, from the raw files at half resolution without demosaicing. Sky: fine-scale a*b* variation in open sky in the full-resolution exports, with each scan’s colour scaled to match the separate-exposure chart.
- Images
- Exported from Obelisk at full resolution with identical settings, and reduced for the web. The second portrait’s white-light scan was exported again with saturation 2.54 instead of 1.4.
Questions
Is RGB light better than white light for scanning colour negatives?
For colour, yes. In our test an RGB light separated colours 13–26% better than a high-CRI white light, with lower hue error and colour that stayed more consistent between under- and overexposed frames. Once colours were matched, noise was similar. A white light that you calibrate for still converts a roll consistently.
Is trichromatic (three-exposure) scanning worth it with a colour camera?
On our setup it gave the best colour of anything we tested: 65% more colour separation than white light and about 30% more than a single RGB exposure. It takes three frames per negative instead of one. The gain comes from avoiding light leaking between the LEDs and the camera’s colour filters, so it depends on your light and camera. Three single-LED frames of clear film show how much yours leak.
Can editing make a white-light scan look like an RGB one?
Mostly. More saturation and colour correction bring the colours close, which is why good converters get good results from white light. White light needed about 1.8 times the saturation of our separate-exposure scans. Once matched, its colour noise was similar to an RGB scan’s on a colour chart and somewhat higher on open sky.
Do I need a monochrome camera for RGB scanning?
No. Separate exposures on a colour camera avoid the LED leak too. A monochrome camera also records every colour at full resolution, without colour filters, but it always needs three exposures per frame.
What white balance should I set when scanning negatives?
It doesn’t affect the converted colour: white balance is a fixed gain on each channel, and it cancels out when the film base is subtracted. It does affect how you judge exposure, because histograms and clipping warnings are drawn after it. Check the raw values instead.
Why does my scan look clipped in Lightroom or Capture One when the raw file isn’t?
Both apply the camera’s white balance before showing the image. On our camera that multiplies the red channel by 2.6, so a red channel that uses the sensor’s full range goes off the top of the display. The clear film base is the brightest part of a negative, so if it reads below about 90% of the sensor’s range in every channel, nothing in the frame is clipped.
Should I use RGB light for slide film?
Usually not. Slide film is made to be viewed under white light, so a high-CRI white light is the better choice. The advantages of RGB described here apply to colour negative film.
Do I need to recalibrate when I change scanning light?
Yes. A profile belongs to a light as well as a film stock. In our measurements, changing the light changed the result more than changing the stock.
Calibrate Obelisk for your light
A profile belongs to a film stock and a light. Calibrating one takes about five minutes with a chart bracket.