Professional camera scanning
Consistent scans, measured rather than estimated
Obelisk converts camera-scanned colour negatives into finished positives. Instead of analysing each image and estimating a correction, it measures how your film stock behaves on your scanning rig, once, and converts every frame through that measurement.
The result is what minilab scanners did well: a whole roll that lands at the same density with the same colour, without an operator correcting frame by frame.
Why camera scanning
Obelisk is a tool for camera scanning: digitising film with a digital camera, a light source and a film transport. Done properly, this is the fastest way to scan film and the highest quality — a modern high-resolution sensor captures more from a negative than dedicated film scanners ever did, at seconds per frame.
The minilab scanners that defined lab digitising — the Frontiers and the Noritsus — have been out of production for roughly two decades. They run on salvaged parts and discontinued software, and every year fewer of them run at all. What replaces them is not another dedicated scanner; it is the camera. What has been missing is the software to make a camera-scanning rig behave like the professional instrument those machines were: conversion that is predictable rather than estimated, and a workflow built for volume. That is the gap Obelisk is built to fill.
Built as an instrument
Obelisk is designed for production scanning: a deterministic converter for high-volume lab work. It is built inside a working film lab, for the lab bench, and is proven in daily production on thousands of real customer frames — not on test charts alone. The design premise is that a conversion should behave like a measuring instrument: the same negative renders the same way every time, for the operator today and for a different operator next month.
- Deterministic, not estimated. There is no per-image auto-balance. Nearly every converter reads each frame and estimates a correction from it; Obelisk converts through a fixed, measured calibration, so a result can be reproduced exactly — frame to frame, roll to roll, machine to machine.
- Colour from calibration. Colour is established once, by measurement, per film stock and light source — not re-decided per image. A fitted correction that fails its statistical quality gates is refused rather than applied.
- Density is the control. Brightness works the way a printer or minilab handles it: as print density. One control moves the frame through a fixed print curve, blacks anchored — no black-point stretching, no re-fitted histogram. Adjusting a frame feels like printing, not editing.
- Built for throughput. A roll is one decision, not thirty-six frames of decisions: assign the film profile and convert. Frames arrive levelled, oriented and cropped, ready for a keyboard-first review pass.
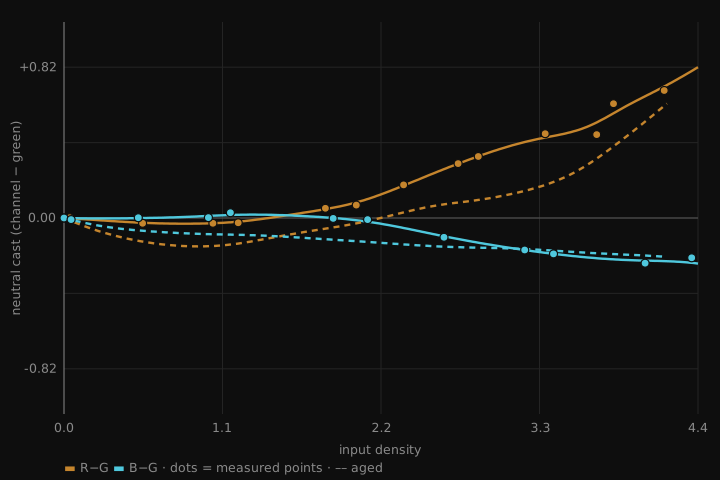 Density fingerprint
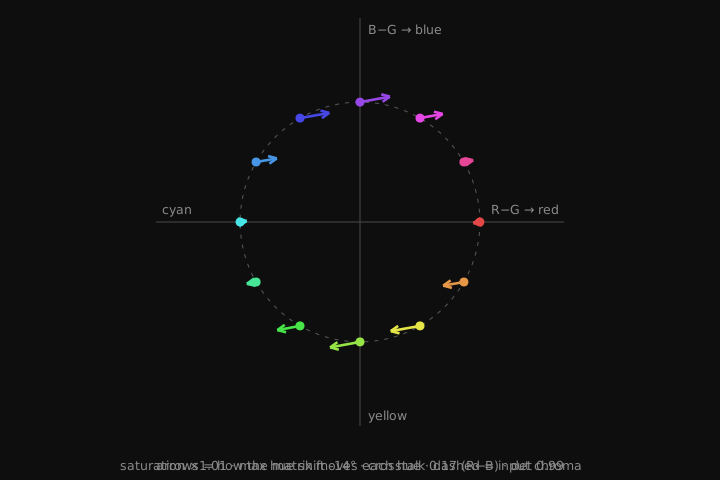 Colour correction
Lab workflow
The workflow is roll-centric, modelled on how a lab runs a day of scanning rather than on a photo editor.
- One decision per roll. Scans land in a watched folder, group into rolls, and convert in the background against the roll's film profile. By the time the operator sits down, the roll is rendered, levelled and consistent.
- Automatic orientation. A local model turns every frame the right way up as it converts. It runs entirely on the machine — no cloud service, nothing leaves the lab — and it suggests rather than forces: a frame is never rotated against an operator's decision.
- Review at speed. A keyboard-first review pass steps through the roll — adjust, retouch, export. Exports run on their own queue, so the next frame is never waiting on the last one's output.
- Grading that travels with the roll. Every per-frame decision is recorded alongside the scans themselves, not only in the application. Clear a roll, archive it, re-scan it next year — it comes back exactly as it was delivered.
Who it is for
Obelisk is built for volume: film labs digitising customer rolls with a digital camera, and photographers scanning their own work who care more about consistency than about per-frame control.
It is not a general-purpose editor, and it deliberately will not convert without a calibration. That constraint is what the consistency is built on. Calibrating a stock takes about five minutes and is done once per film stock and light source.
Its natural reference point is the professional scanner-software class — the tools a lab standardises on and trains staff around — rather than single-image conversion plugins. It is calibrated, repeatable, and deliberately uneventful in daily use.
The problem with per-image correction
Most negative conversion works from the image: it reads each frame's statistics — white point, black point, average colour — and estimates a correction. That approach fails in exactly the situations that fill real rolls.
- Scenes without neutral content drift. A red room, a forest, a sunset — average-to-grey logic reads the scene itself as a colour cast and corrects it away.
- Mis-exposed frames get corrected toward the wrong target. Over-exposed frames come out bright and desaturated; night shots get lifted to grey.
- Frame-by-frame analysis drifts frame by frame. Two photos taken seconds apart can render differently because something in the scene changed the histogram.
A conversion can only be as consistent as the thing it anchors to, and scene statistics are not stable. The film's physical behaviour is.
What Obelisk measures instead
A short calibration session — a colour chart photographed on one roll of the stock, bracketed in one-stop steps — captures how that film actually responds on your light and your camera.
- A density fingerprint Dozens of measured points along each colour channel's response curve, across ±3 stops. Neutral reads neutral at every density level, not just at one — which removes the shadow and highlight casts that a single white balance move can never fix.
- A fitted colour matrix The chart's colour patches fit a cross-channel correction for the overlap between the film's dye layers and the camera's colour filters. It passes statistical quality gates or it is not used.
- The film's own base Each roll's unexposed film base is measured and subtracted in density space, so the orange mask and the scan light's colour cancel exactly — per roll, not estimated per frame.
- Exposure as arithmetic On a negative, an exposure error is a uniform density offset. It is removed with a gain that preserves colour ratios, placing every frame at the same print density.
Aged film, measured
Aged film — expired stock, or exposed rolls that waited years for development — does not simply fade. Its colour balance shifts unevenly across the tonal range: shadows drift toward magenta while highlights drift toward teal. Because the error bends with density, no white-balance move can remove it — white balance is a straight-line correction, and this is a curve. Auto-balancing converters average the two casts against each other and leave both in the frame: magenta shadows, teal skies.
Obelisk treats ageing the way it treats everything else: as something to measure rather than estimate. The same film stock is calibrated twice — once fresh, and once from film deliberately aged before development — capturing how ageing actually bends each colour channel's response, at every density level.
The correction is a single per-roll control. Zero is the fresh calibration; raising the de-aging strength applies the measured ageing shift in reverse until the roll's neutrals line up. Shadows and highlights return to neutral together, because the correction follows the same curve the ageing did — not a compromise between two casts.
Scanning light, measured at the sensor
Digital cameras apply substantial white balance gains to raw sensor data before you see anything — on a typical body, around ×2.6 on red and ×1.6 on blue. A light mix that looks well balanced on the camera's histogram can leave the sensor badly starved of red, and colour negative film blocks most red to begin with.
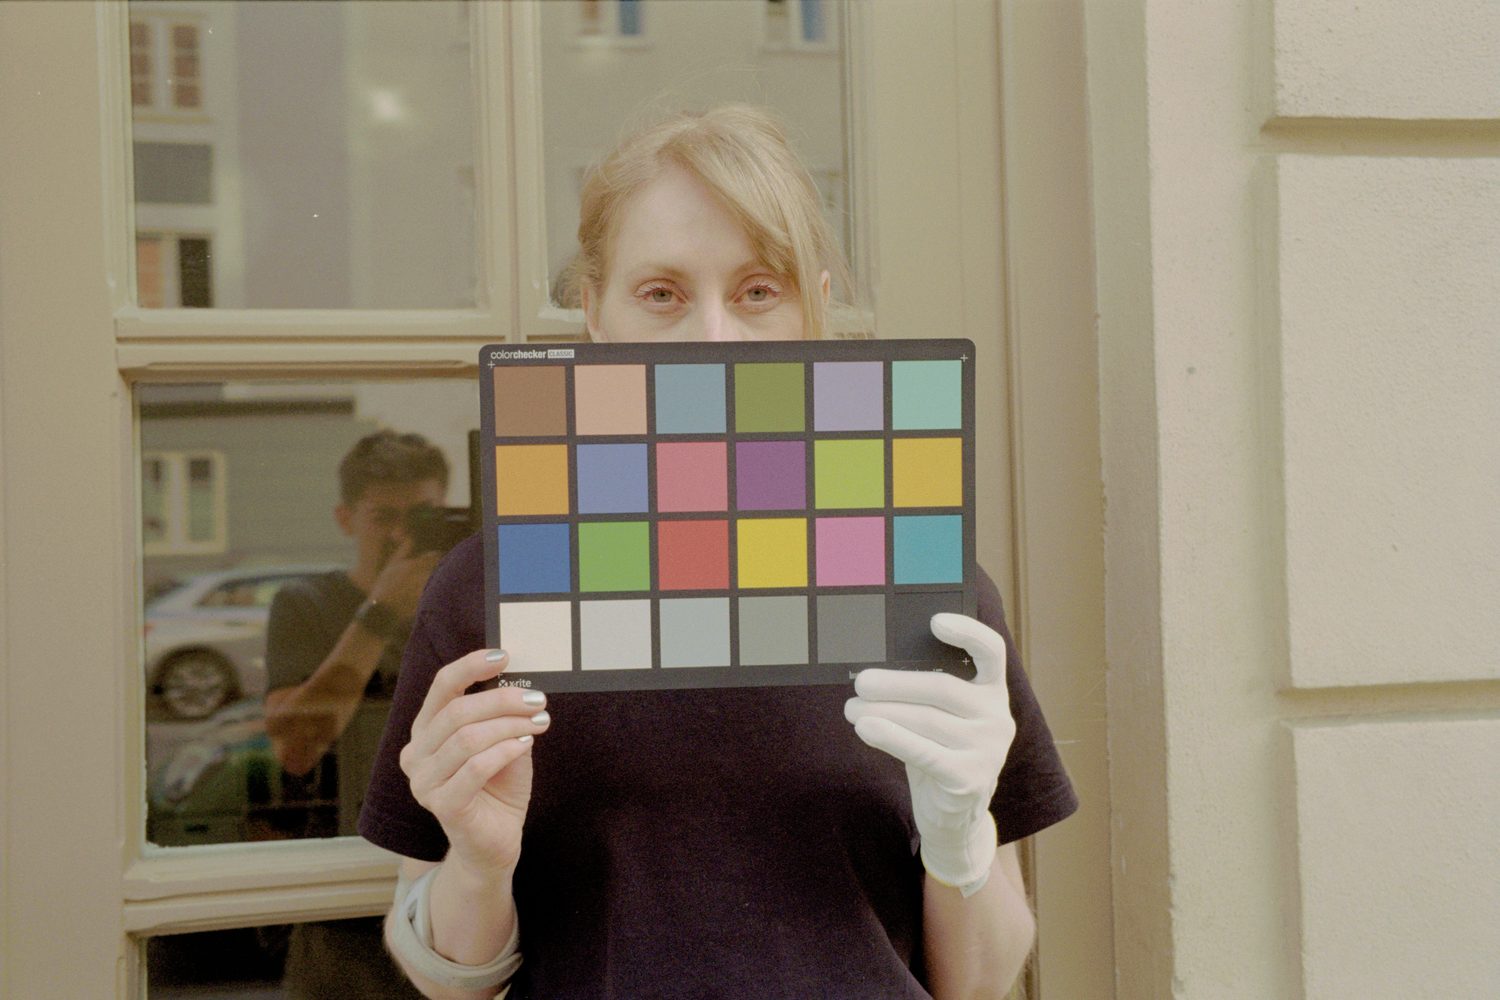
Tuning the light against raw, gain-free sensor values instead of the camera's processed preview produced a substantial improvement in red-channel quality for the same scan.
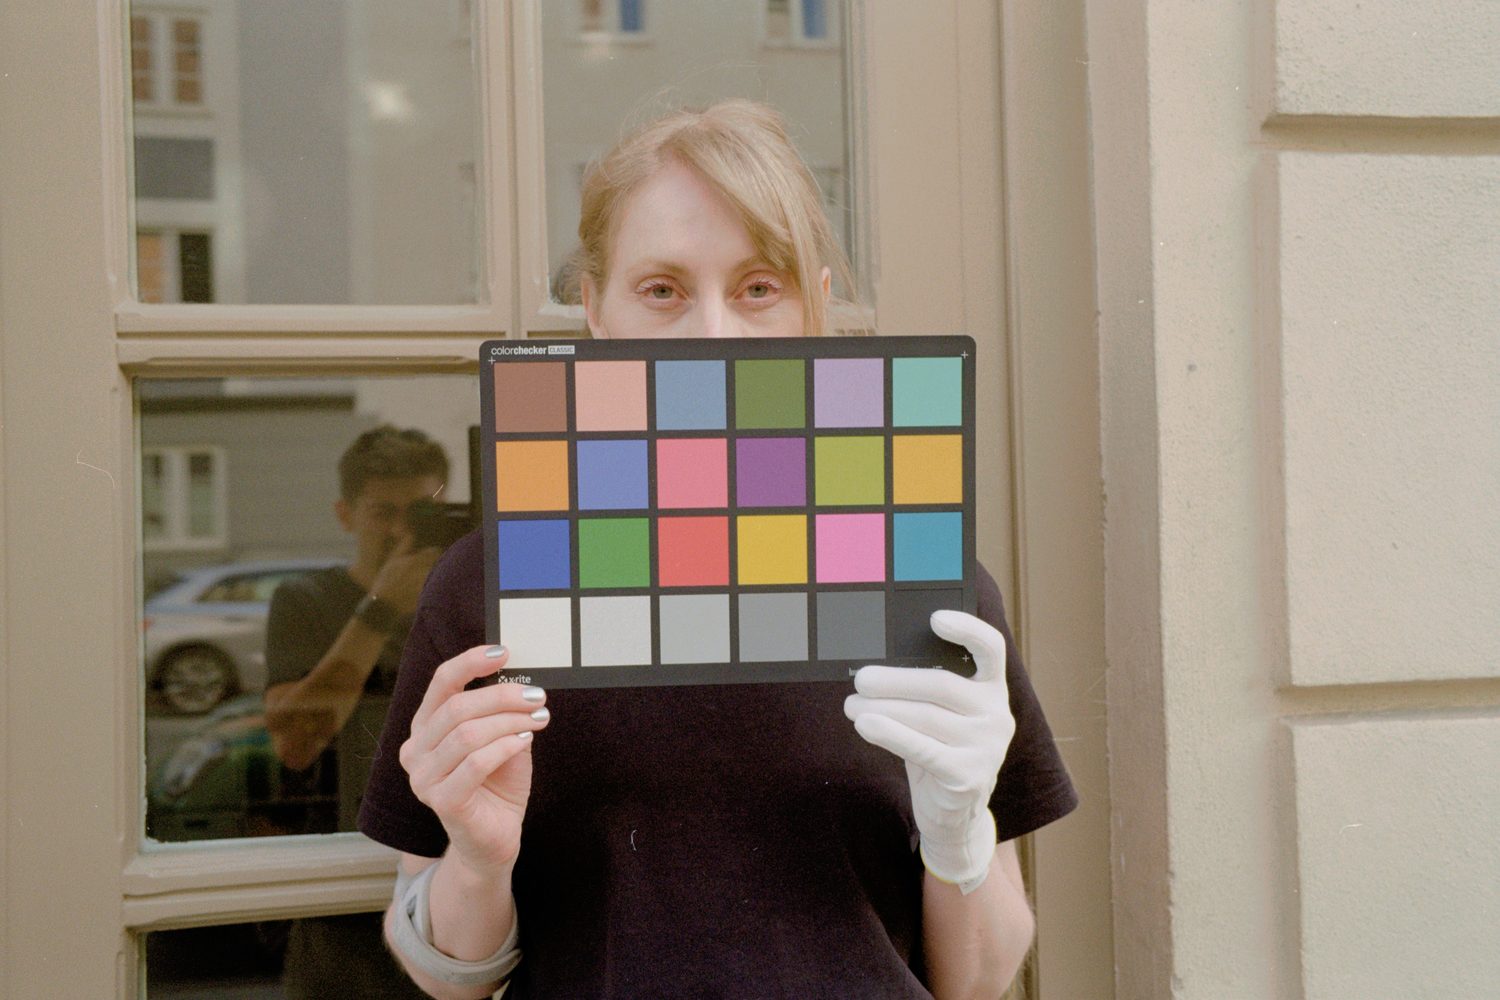
 Daylight-balanced
Sensor-balanced
Daylight-balanced
Sensor-balanced
White light works too
None of this makes an RGB source a requirement. Obelisk works with white light — an LED panel, a light table — because calibration is measured for whichever light you actually use. The chart session is identical either way, and a white-light profile is as consistent across a roll as an RGB one.
The difference is how much colour information reaches the sensor. Measured on the same negatives scanned both ways, narrowband RGB resolves about 20% more separation between colours, because narrow channels read closer to the film's actual dye densities. White light gave no noise advantage in exchange. So RGB extracts more from the same negative, but white light is a perfectly workable starting point.
One rule holds regardless: a profile belongs to a light source as well as a film stock. The overlap between channels changes with the light, so a profile calibrated under one cannot be converted to another — scanning the same stock under a different light means one more five-minute chart session.
Metrics and warnings
A deterministic conversion is only as good as the scan behind it, so Obelisk measures the scans themselves and says so when something is wrong — at intake, while it can still be fixed, not after a roll has been delivered. These are the indicators the operator sees, on the frames they apply to.
- ⚠ 17% clipScan too bright Raw sensor channels are checked for clipping before any processing. A clipped scan has destroyed data at capture — nothing downstream can recover it — so the frame is flagged with the measured clip fraction and the instruction is simple: rescan darker.
- ⚠ 42%Scan too dim Scan level is read as a percentage of sensor scale against the calibrated target. A dim scan converts, but with more noise and less colour separation — the flag says how many stops to raise before that cost is paid.
- ▲ +1.4▼ thinFilm exposure, separated from scan exposure A badly made scan and a badly exposed negative are different mistakes, and the flags keep them apart. Each frame's over- or under-exposure is measured in density from the film itself — useful to the lab, and worth passing on to the customer whose meter runs a stop out.
- ⚠ lightWrong scanning light Every roll's film-base signature is compared against the one recorded at calibration. A roll scanned under the wrong light source — the mistake that otherwise surfaces as a roll that will not dial in — is flagged at the roll header before any time is spent on it.
- f/2.8 ≠ f/5.6Wrong lens setting The aperture a profile was calibrated at is stored with it, and each scan's EXIF is checked against it. A mis-set lens changes the light through the whole rig; it is caught per frame instead of discovered per roll.
While setting a rig up, a live tuning mode measures each new scan as it lands — per-channel sensor levels against the target band, in a readout designed to be legible from the scanning position. The same per-frame measurements accumulate per roll, which is the basis for a planned customer-facing exposure report: how many frames over, how many under, and by how much.
Consistency, compared
The test below is one exposure bracket — the same scene shot seven times, from several stops under to several stops over — scanned once, then converted by four tools from the same RAW files. The only manual adjustment in any tool was density, brought toward a similar level where the tool offers a density control; nothing else was touched. A converter that anchors to the film renders these frames nearly alike; a converter that estimates from each image drifts. The same test is shown for two film stocks — switch between them below.
Each row is one tool across the bracket. Read along a row: the differences within a row are what that tool would do across an ordinary roll.
Inspect a frame
Pick a frame, then switch tools — the image swaps in place, so differences show as a flicker.
Real scenes
A set of varied scenes from the same film stock, converted by each tool with the same settings as the bracket and no per-frame adjustments. Pick a frame, then switch tools.
Method: identical RAW camera scans (white-light source) converted in each tool. The only manual adjustment anywhere was density, brought toward a similar level where the tool provides a density control; Negative Lab Pro offers no simple density control and was left at its defaults. No colour, contrast or other settings were changed in any tool. Deep under-exposed frames are left dark by Obelisk by design rather than lifted. Full-resolution exports were downsized identically for the web. Product names belong to their respective owners.
Status
Obelisk is in active development and not yet available. It already runs in daily production at the film lab it is being built in. It will be released as a commercial product; availability and pricing will be announced here.